Have you ever dreamed of standing on top of Africa?
Climbing Kilimanjaro, the continent’s highest peak, is more than just a trek—it’s an exhilarating adventure that appeals to thrill-seekers from around the globe!
Did you know that over 50,000 climbers attempt to reach Uhuru Peak each year? This mountain offers breathtaking views, diverse ecosystems, and a journey that challenges both your physical and mental limits.
Yet, embarking on this incredible expedition can feel overwhelming without the right knowledge and preparation.
In this comprehensive guide, we’ll walk you through everything you need to know about climbing Kilimanjaro, from choosing the perfect route that matches your skill level to essential tips for planning your adventure.
Whether you’re a seasoned climber or a novice adventurer, we’ll ensure you’re equipped with the insights to make your Kilimanjaro climb unforgettable!
Why Climb Kilimanjaro?
Climbing Kilimanjaro isn’t just about reaching the summit; it’s about the journey that leads you there! With its stunning landscapes and unique wildlife, Kilimanjaro attracts adventurers seeking both a challenge and beauty.
The opportunity to experience various climate zones—from lush rainforests to alpine deserts—makes every step an adventure. Additionally, standing at Uhuru Peak, the highest point in Africa at 5,895 meters (19,341 feet), provides an exhilarating sense of achievement.
It’s a moment that climbers cherish for a lifetime, including me!
Overview of Climbing Routes
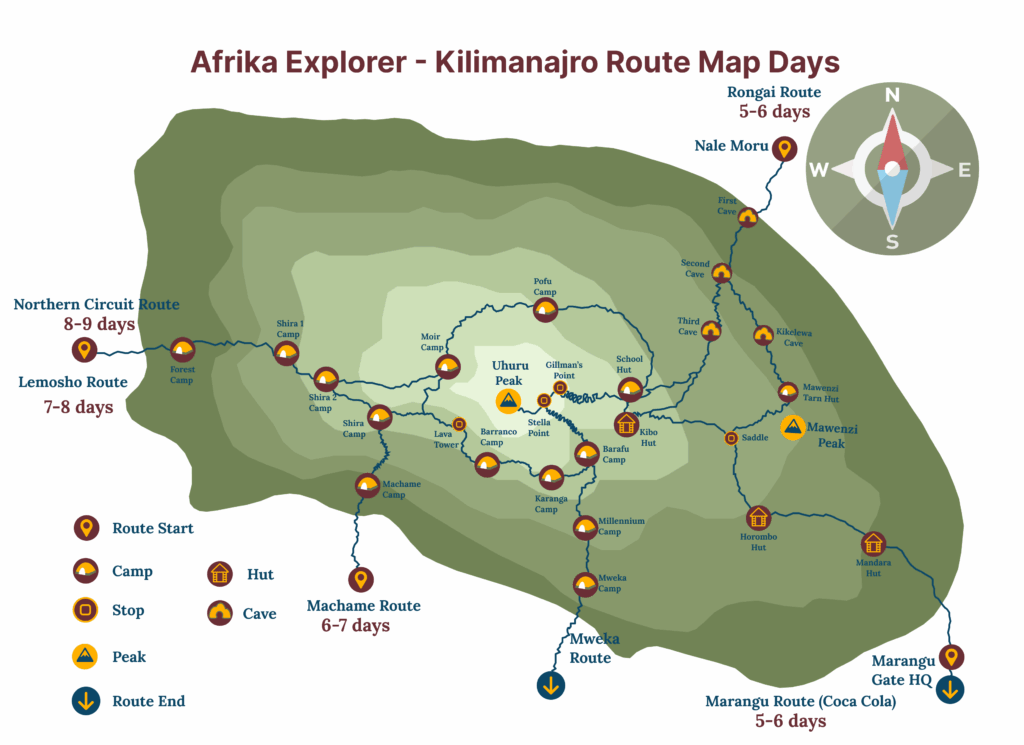
Kilimanjaro offers several routes to the summit, each with its unique characteristics, pros and cons.
Marangu Route
The Marangu Route, known as the “Coca-Cola Route,” is the most popular and straightforward option, offering comfortable hut accommodations though shared with other climbers.
It’s suitable for beginners due to its gradual ascent and shorter duration (5-6 days). However, it tends to be crowded and has a lower success rate due to the quick altitude gain each day.

Pros:
- Accommodation: Comfortable shared (four in a room) hut accommodation throughout the trek.
- Ease of Access: The easiest route for beginners with gradual slopes.
- Duration: Typically completed in 5-6 days, making it a quickest option.
Cons:
- Crowds: This route is the most popular, leading to more climbers.
- Limited Scenery: Less diverse landscapes compared to other routes.
- Lower Success Rate: Faster ascent leads to a higher risk of altitude sickness.
Machame Route
The Machame Route, or “Whiskey Route,” is favored for its scenic beauty and diverse landscapes. It takes 6-7 days, allowing for better acclimatization.
The trek is more challenging and involves camping, making it ideal for adventurers that don’t mind roughing it while seeking a rewarding experience, though it may encounter variable weather.

Pros:
- Scenic Beauty: Known for stunning views and varied landscapes.
- Longer Acclimatization: Typically takes 6-7 days, allowing for better acclimatization.
- Challenging Terrain: Offers a more adventurous experience for trekkers.
Cons:
- Camping: Involves camping, which may be less comfortable for some climbers.
- Steeper Sections: Some challenging parts that may require a bit more effort.
- Weather Variability: Rain is more common in the forest, especially during the rainy season.
Lemosho Route
The Lemosho Route provides a remote and scenic ascent, often regarded as one of the most beautiful routes. It typically takes 7-8 days, promoting optimal acclimatization time for climbers.
While it’s less crowded (and getting more popular) and offers stunning views of the Shira plateau, it is also tends to be more expensive as you spend more days on the mountain.

Pros:
- Remote and Scenic: Less crowded, providing a more tranquil experience.
- Variety of Landscapes: Offers diverse ecosystems like the Shira plateau and stunning views of the summit from western view point.
- Optimal Acclimatization: Usually takes 7-8 days, promoting better acclimatization.
Cons:
- Longer Duration: Takes longer to complete, which may not suit everyone’s schedule.
- Higher Cost: More expensive due to its remote nature and longer days on the mountain.
- Variable Terrain: Some sections may be less maintained.
Rongai Route
Starting from the northern side, the Rongai Route is one of the least traveled options, providing a quieter experience. It features a gradual ascent over 6-7 days, which aids acclimatization.
However, it has limited scenery and camping accommodations.

Pros:
- Less Crowded: One of the least traveled routes, offering solitude.
- Unique Approach: Starts from the northern side, providing a different perspective of Kilimanjaro.
- Gradual Ascent: Offers a slower, gentler climb, aiding acclimatization.
Cons:
- Camping: Involves camping, which may be uncomfortable for some.
- Longer drive to start: As you have to drive around the mountain it takes longer to get to the starting point.
- Fewer Facilities: Limited support and services compared to more popular routes.
Umbwe Route
The Umbwe Route is designed for experienced climbers looking for a challenging ascent. It’s the steepest and most demanding route, offering breathtaking views along the way.
With a shorter acclimatization time, it presents a higher risk of altitude sickness and it’s the route that climber who want to break records use.

Pros:
- Challenging: Ideal for experienced climbers seeking a more difficult ascent.
- Fewer Climbers: One of the least traveled routes, offering a unique experience till Baranco camp where it joins the other routes.
- Stunning Views: Offers spectacular scenery along the way.
Cons:
- Difficult Terrain: Steeper and more demanding than all the other routes.
- Shorter Acclimatization Time: Higher risk of altitude sickness due to rapid ascent.
- Camping Experience: Involves camping, which may be less comfortable.
Choosing the Right Route
Selecting the best route for your Kilimanjaro climb depends on several factors.

Main factors to consider: fitness level, time constraints, and scenic preferences.
Your fitness level and experience—if you’re a beginner, a route with a more gradual acclimatization, like Lemosho, Rongai or Machame, might suit you better.
Time constraints can also play a significant role; some routes are shorter than others, requiring fewer days on the mountain.
If breathtaking scenery is your priority, Machame and Lemosho offer the most stunning views throughout the ascent to Uhuru Peak.
Ultimately, choose a route that aligns with your personal goals and hiking preferences to ensure you have an enjoyable experience!
Preparing for the Climb
Preparation is key to a successful climb!
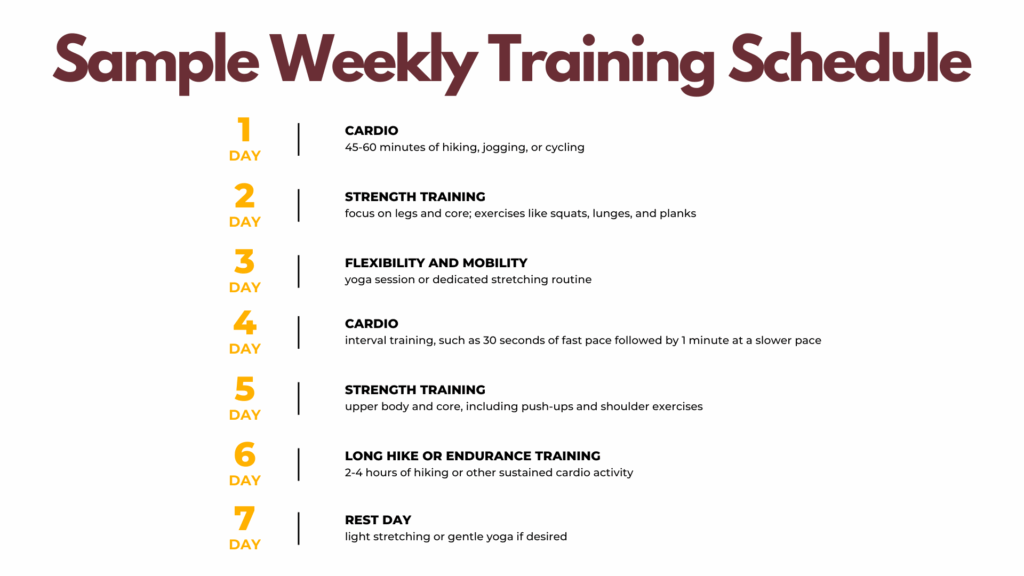
Start with a fitness training program several months (recommended three) before your trip.
How?
Focus on building endurance through cardio exercises like hiking, running, or cycling. Incorporate strength training to help your body handle the physical demands of the trek.
Additionally, understanding the importance of acclimatization is crucial—spending extra days on the mountain to adjust to the altitude can significantly impact your success.
Don’t forget taking it slow and steady (pole pole meaning slowly slowly)
Prepare mentally as well; What worked for me is taking it one day at a time not worrying about the next day. Also visualize the climb, anticipate challenges, and set realistic goals to keep you motivated.
Best Time to Climb Kilimanjaro
The best time to climb Kilimanjaro typically falls between January to March and June to October, when weather conditions are most favorable.
January and February offer cooler temperatures and less expected rain, making them ideal for climbers seeking clear skies.
Conversely, June through October is the dry season, with warmer weather, though you may encounter more climbers during this period.
Understanding the weather patterns will help you choose the right time to tackle this monumental challenge.
Pro Tip:
- Plan your climb to start on a weekday, as most people tend to start their climb on weekends.
- Summit night to coincide with a full moon, you won’t need your head lamp as much and more visibility during the ascent.
Packing for Kilimanjaro
Considering what to pack for your climb on Kilimanjaro is important, while keeping in mind the recommended weight (as porters carry your bag while on the mountain).
Always make you try out the items before packing them to be sure you have everything you need for a comfortable and safe trek.
Here are the seven essential categories with suggested items:
1. Clothing
- Base Layers: Moisture-wicking shirts and thermal tops keep you dry and warm.
- Insulating Layers: Fleece jackets or down vests provide warmth during cold nights and early morning days.
- Outer Layers: Waterproof and windproof jackets are essential to protect against rain and wind.
- Trekking Pants: Quick-drying, breathable pants are ideal for varying weather conditions.
- Warm Hat and Gloves: Essential for keeping warm, especially during summit night.
2. Footwear
- Hiking Boots: Sturdy, broken into (worn at least 3 times), waterproof boots with good ankle support are crucial for rough terrain.
- Trekking Socks: Moisture-wicking socks help prevent blisters and keep your feet dry, save one pair for summit night.
- Camp Shoes: Lightweight shoes for relaxing at camp after a long day of trekking.
3. Gear and Equipment
- Daypack: A comfortable, lightweight backpack (20 l to carry daily essentials like water, snacks, and rain gear.
- Trekking Poles: Help with stability and reduce strain on your knees during steep ascents and descents.
- Headlamp: A reliable headlamp with extra batteries is essential for navigating in the dark.
- Sleeping Bag (optional): Might be provided by your tour operator, best check with them first. If not a high-quality, 4-season sleeping bag rated for cold temperatures (-10 Celsius or 13.6 Fahrenheit) ensures warmth at night.
4. Hydration and Nutrition
- Water Bottles or Hydration Bladder: Staying hydrated is crucial; consider carrying at least 3 liters of water capacity.
- Electrolytes Tablets: Your tour operator should ensure safe drinking water from streams and have a refill station at camp, having these can help with the taste of the water.
- Snacks: High-energy snacks like nuts, energy bars, and dried fruits provide quick nutrition during hikes.
5. Personal Items
- Sunscreen: Protect your skin from the high-altitude sun at least factor 50 and above.
- Lip Balm with SPF: Keeps your lips hydrated and protected against sunburn.
- Toiletries: Travel-sized items such as toothbrush, toothpaste, wet wipes, and hand sanitizer.
- First Aid Kit: A basic first aid kit with essentials like band-aids, antiseptic wipes, and altitude sickness medication.
6. Technology and Navigation
- Camera or Smartphone: To capture memories of your adventure, make sure you have extra charged batteries.
- Power Bank: A portable charger for your devices, as power sources are not available on the mountain.
- Map or GPS Device: Helpful for navigation and understanding the terrain, especially on less traveled routes.
7. Documents and Cash
- Passport and Copies: Ensure you have your passport with you at all times as if you have an emergency while on the mountain then you can get help right away and a couple of photocopies for safety.
- Travel Insurance: Essential for any international travel you should get one that covers any emergencies or unexpected situations at high altitude.
- Cash: Small denominations of Dollars for tips and purchases along the way, though it’s required to now pay everything in Tanzanian Shillings while in Tanzania.
By categorizing your packing list, you can ensure that you are well-prepared for your Kilimanjaro adventure. Each item plays a crucial role in enhancing your comfort, safety, and overall experience on the mountain.
Health and Safety Tips
Your health and safety are paramount when climbing Kilimanjaro, make sure you consult a physician before leaving and communicate any per-existing conditions to your guide.
Acclimatization is vital; ascending slowly to allow your body to adjust to the altitude (Pole pole, you will hear this a lot on the mountain).
Stay hydrated—drink plenty of water throughout the climb to avoid altitude sickness, it can be annoying sometimes waking up several times at night.
Listen to your body; if you experience severe headaches, dizziness, or nausea, it’s crucial to talk to your guide, descending to a lower altitude might help. Ensure you have access to basic medical supplies, including altitude sickness medications, to address any potential health concerns during your journey.
What to Expect on the Climb
Understanding what to expect can alleviate some of the challenges associated with climbing Kilimanjaro.
Each day presents different challenges and stunning scenery, from lush forests to rocky paths taking it on day at a time is key.
You’ll rise early (around 6 am) each day, trekking for several hours before reaching your campsite you will have lunch on-route or in camp.
Expect physical exertion but also moments of awe as you take in the beauty surrounding you each day will be different depending on the route.
Prepare for mental challenges as well; staying positive and focused on your goal will help you overcome tough moments during the climb.
Pro tip:
- For most climbers you won’t shower for the duration of your climb, unless you are opted for a more luxurious climb (shower included) that hot bath when you get back to the hotel —best one I’ve ever had.
Summit Day: The Final Push
Summit day is the climax of your Kilimanjaro adventure! Climbers typically begin their ascent around midnight to reach Uhuru Peak at sunrise.
This challenging trek involves steep inclines and rocky paths, demanding your utmost effort especially as you are trekking very slowly as night. It’s essential to pace yourself, taking breaks as needed to conserve energy.
When you finally reach Stella point the summit, the reward is exhilarating—the stunning view of the sun rising over the African landscape with Mount Meru on the horizon is an unforgettable sight!
Celebrate your achievement (take photos) and take a moment to soak it all in before your descent.
To Wrap Up
Climbing Kilimanjaro is an incredible journey filled with challenges and rewards.
Choosing the right route to preparing adequately and understanding what to expect, every step brings you closer to achieving your dream of standing atop Africa.
As you plan your adventure, remember the insights shared in this guide, and embrace the thrill of the climb!
FAQs on Climbing Kilimanjaro
What is the best route to climb Kilimanjaro?
The best route depends on your experience level, time available, and scenic preferences. Popular options include Machame for its beauty and Marangu for its ease.
How fit do I need to be to climb Kilimanjaro?
While a moderate fitness level is sufficient, training in advance to build endurance is highly recommended.
What is the success rate for climbing Kilimanjaro?
Success rates vary by route, but overall, about 65-75% of climbers reach Uhuru Peak.
How much does it cost to climb Kilimanjaro?
Costs can range from $2,000 to $5,000 or more, depending on the route, guide services, luxury of the climb, and duration of the trek.
What gear is essential for climbing Kilimanjaro?
Essential gear includes clothing, personal items, trekking poles, a headlamp, and a good pair of hiking boots.
Can I climb Kilimanjaro without a guide?
No, it’s recommended to climb with a registered tour operator and licensed guide for your safety and to comply with local regulations.


